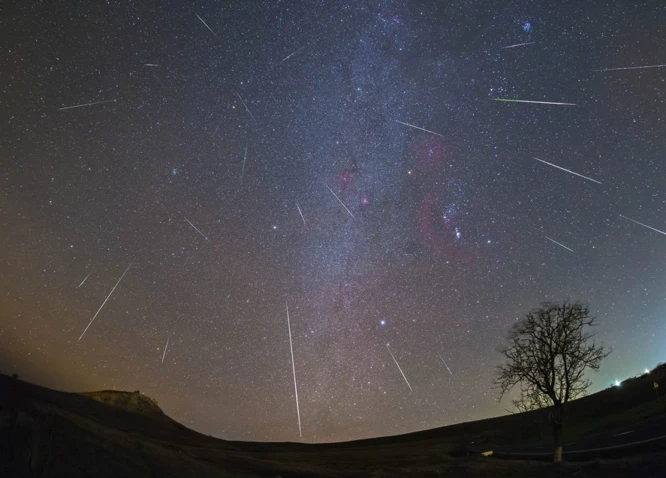
Are you ready to capture the awe-inspiring beauty of a meteor shower through your camera lens? Photographing meteor showers requires careful planning, the right gear and equipment, as well as an understanding of camera settings and composition techniques. In this comprehensive guide, we will take you through the step-by-step process of capturing stunning images of meteor showers. From researching the meteor shower and scouting for the perfect location to selecting the right camera and lenses, adjusting camera settings, and framing your shots with creativity, we’ve got you covered. So grab your camera and get ready to capture the magic of meteor showers like never before.
Contents
- 1. Plan Ahead
- 2. Gear and Equipment
- 3. Camera Settings
- 4. Composition and Framing
- 5. Patience and Timing
- Conclusion
-
Frequently Asked Questions
- 1. When is the best time to photograph a meteor shower?
- 2. Do I need a special camera to capture meteor showers?
- 3. What lenses are recommended for photographing meteor showers?
- 4. How should I focus my camera for meteor shower photography?
- 5. What camera settings should I use for photographing meteor showers?
- 6. Should I use long exposure noise reduction?
- 7. How can I compose my shots for meteor shower photography?
- 8. Do I need a tripod for photographing meteor showers?
- 9. Can I photograph meteor showers with a smartphone?
- 10. How long should I be patient to capture meteor showers?
- References
-
Frequently Asked Questions
- 1. How often do meteor showers occur?
- 2. What causes meteor showers?
- 3. What is the best time to photograph a meteor shower?
- 4. How can I find the exact peak time of a meteor shower?
- 5. Can I use a smartphone to photograph meteor showers?
- 6. How can I minimize camera shake when photographing meteor showers?
- 7. Should I use autofocus or manual focus for meteor shower photography?
- 8. How long should I set my shutter speed for meteor shower photography?
- 9. What can I do if I live in an area with high light pollution?
- 10. Are there any safety precautions I should take when photographing meteor showers?
- References
- Read More
1. Plan Ahead
Before heading out to photograph a meteor shower, it is important to research the specific meteor shower you will be capturing. Each meteor shower has its own peak dates and times, as well as unique characteristics. Some showers produce more meteors than others, so knowing the peak activity period will help you maximize your chances of capturing the best shots. Websites like the American Meteor Society can provide you with detailed information about upcoming meteor showers, their peak times, and the expected meteor rates. Take note of the radiant point, which is the location in the sky from which the meteors seem to originate, as this can help you determine the best composition for your shots.
Finding the right location to photograph a meteor shower is crucial for capturing stunning images. Look for a spot away from city lights and light pollution to ensure a clear and dark sky. This will help the meteors stand out more prominently in your photographs. Consider locations with interesting foreground elements such as mountains, trees, or bodies of water to add depth and visual interest to your shots. Use online tools or smartphone apps to locate areas with minimal light pollution, and plan your trip accordingly. Remember to secure any necessary permissions if you are photographing from private property or protected areas.
Checking the weather forecast is essential before heading out to photograph a meteor shower. Clear skies are ideal for capturing meteors, as clouds can obstruct your view and make it challenging to capture the desired shots. Look for nights with minimal cloud cover, and pay attention to the moon phase as well. A new moon or a moonless night will provide the darkest sky, allowing the meteors to shine brightly. If there is a risk of clouds or unfavorable weather conditions, consider rescheduling your photography outing to ensure the best possible results.
Planning ahead plays a crucial role in successfully photographing a meteor shower. Researching the specific shower, scouting for an optimal location, and checking the weather forecast will greatly increase your chances of capturing breathtaking images of these celestial phenomena. So, take the time to plan accordingly and get ready for an unforgettable photography experience under the stars.
1.1 Research the Meteor Shower
When researching a meteor shower, there are several key aspects to consider in order to make the most of your photography experience. Start by identifying the name and peak dates of the meteor shower you plan to photograph. Websites like the American Meteor Society provide detailed information on upcoming showers, including their peak times and expected meteor rates. Understanding the characteristics of the meteor shower will help you determine the best techniques for capturing the meteors. For example, some showers are known for producing fireballs or bright meteors, while others may have a slower rate of activity. Additionally, take note of the radiant point, which is the location in the sky where the meteors appear to originate. This information will be helpful in composing your shots, as you can position your camera to capture the meteors as they radiate from this point. Gain a deeper appreciation for meteor showers by exploring their scientific significance and cultural symbols. For instance, some meteor showers have connections to mythology, such as the Perseids being associated with the Greek mythological hero Perseus. By delving into the rich history and lore surrounding meteor showers, you can enrich your photography experience and connect with the celestial wonders above.
1.2 Scout for the Perfect Location
When scouting for the perfect location to photograph a meteor shower, it’s important to find a spot with minimal light pollution. Light pollution from cities and towns can diminish the visibility of stars and meteors, making it more challenging to capture clear and vibrant images. Look for areas away from major sources of artificial light, such as streetlights and buildings. National parks, remote countryside areas, and beaches are often great options for minimal light pollution. Use smartphone apps or websites that provide light pollution maps to identify suitable locations near you. In addition to dark skies, consider finding a location with interesting foreground elements. This could include mountains, trees, or bodies of water, which can add depth and visual interest to your photographs. By choosing the right location, you can enhance the overall composition of your meteor shower images and create stunning visuals that capture the awe-inspiring beauty of the night sky.
1.3 Check the Weather Forecast
Checking the weather forecast is an essential step in preparing to photograph a meteor shower. Here are some tips to keep in mind when checking the weather forecast:
1. Use reliable sources: Make sure to consult reputable weather websites or apps that provide accurate and up-to-date information. Websites like Weather.com, AccuWeather, or the National Weather Service are reliable sources to check for meteorological conditions.
2. Look for clear skies: The most important factor for successful meteor shower photography is having clear skies. Look for forecasts that indicate clear or mostly clear conditions with minimal cloud cover. Clouds can obstruct your view of the meteors and diminish the quality of your images.
3. Consider moon phase: The moon’s brightness can also affect the visibility of meteors. Check the moon phase during the night of the meteor shower. Ideally, you want to photograph during a new moon or when the moon is in its crescent phase, as the sky will be darker and the meteors will be more visible.
4. Watch out for precipitation: Keep an eye on the forecast for any chances of rain, snow, or other forms of precipitation. Precipitation can hinder your photography plans and make it difficult to capture clear shots of the meteor shower.
5. Pay attention to wind conditions: Windy conditions can cause camera shake and affect the stability of your tripod. Strong gusts of wind can also introduce unwanted motion blur in your images. Check the wind speed and plan accordingly by using a sturdy tripod and taking measures to minimize camera shake.
Remember, weather forecasts are not always 100% accurate, so it’s a good idea to keep checking the forecast on the day of the meteor shower. Flexibility is key, and if the weather conditions aren’t favorable, consider rescheduling your photography outing for another clear night. With careful consideration of the weather forecast, you can increase your chances of capturing stunning images of a meteor shower.
2. Gear and Equipment
When it comes to photographing meteor showers, having the right gear and equipment is essential to capture stunning images. Here are the key elements you need to consider:
Camera Selection: Choose a camera that allows manual control over settings such as aperture, shutter speed, and ISO. A DSLR or mirrorless camera is ideal for this type of photography as they offer versatility and control.
Essential Lenses: Wide-angle lenses with a low aperture (f/2.8 or lower) are perfect for capturing meteor showers. These lenses allow you to capture a wide field of view, which is important for capturing the entire meteor trail.
Tripods and Mounts: Stability is crucial when photographing meteor showers due to the long exposure times. Invest in a sturdy tripod to keep your camera steady throughout the exposure. Additionally, a tripod with a ball head or a fluid head will allow you to adjust the composition easily.
Optional Accessories: Consider using a remote shutter release or an intervalometer to minimize camera shake. These accessories allow you to trigger the camera without touching it, resulting in sharper images. Also, carrying extra batteries and memory cards is essential for longer photography sessions.
Remember, the gear you choose will depend on your budget and photography preferences. Having a camera that allows manual control, a wide-angle lens, a stable tripod, and optional accessories will provide you with a solid foundation to capture mesmerizing images of meteor showers. So, gather your equipment, and get ready to capture the magical moments in the night sky.
2.1 Camera Selection
When it comes to photographing meteor showers, choosing the right camera is essential for capturing high-quality images. While you can use any camera, including smartphones or point-and-shoots, a digital single-lens reflex (DSLR) or mirrorless camera will offer greater versatility and control over your shots.
DSLR and mirrorless cameras allow you to use interchangeable lenses, which is beneficial for capturing different compositions and perspectives during a meteor shower. These cameras also offer manual settings, allowing you to have complete control over your exposure and focus.
One important factor to consider is the camera’s low-light performance. Since meteor showers occur in dark skies, a camera with good low-light capabilities will help you capture the faint trails of meteors more effectively. Look for a camera with a wide ISO range and low noise performance to ensure clean and sharp images even in low-light conditions.
Additionally, consider the camera’s resolution. Higher megapixels can help you capture more detail in your images, allowing for greater flexibility when it comes to cropping and post-processing.
It’s worth noting that if you don’t own a DSLR or mirrorless camera, you can still capture meteor showers with a smartphone or a point-and-shoot camera. However, the level of control and image quality may be limited compared to more advanced cameras. With that said, it’s always a good idea to utilize the best camera you have available to capture these captivating celestial events.
Remember, the camera you choose ultimately depends on your budget, level of expertise, and equipment availability. What matters most is your ability to understand and utilize the camera’s manual settings effectively to capture the beauty of the meteor shower.
2.2 Essential Lenses
When it comes to choosing lenses for photographing meteor showers, there are a few essential options to consider. The first lens to have in your kit is a wide-angle lens, preferably with a focal length between 14mm and 35mm. Wide-angle lenses allow you to capture a larger portion of the night sky, making them ideal for capturing the sprawling trails of meteors across a wide area. These lenses provide a wider field of view, allowing you to include more of the night sky and any interesting foreground elements in your composition.
Another important lens to consider is a fast prime lens with a wide aperture, such as f/1.4 or f/2.8. These lenses excel in low-light situations and allow you to capture more light, resulting in brighter and more detailed meteor trails. The wide aperture also allows you to achieve a shallow depth of field, creating a pleasing bokeh effect in your images. This can be particularly useful when photographing foreground elements or creating a sense of depth in your composition.
If you have a telephoto lens in your camera bag, such as a 70-200mm or 100-400mm lens, it can come in handy as well. While not essential, a telephoto lens allows you to zoom in on specific areas of the night sky and capture closer shots of meteors. This can be particularly useful when photographing individual meteors or trying to capture detailed patterns within meteor showers.
Ultimately, the choice of lenses depends on your personal preference and the type of shots you want to capture. A combination of a wide-angle lens for capturing the panoramic night sky and a fast prime lens for capturing detailed meteor trails is a versatile setup that can yield stunning results. So, make sure to pack these essential lenses in your camera bag for your next meteor shower photography adventure!
2.3 Tripods and Mounts
When photographing meteor showers, having a stable platform for your camera is crucial to ensure sharp and clear images. This is where tripods and mounts come into play. A tripod is a three-legged support system that keeps your camera steady during long exposures. Look for a sturdy tripod made from lightweight materials such as carbon fiber, as it will be easier to carry and set up in the field. Additionally, consider the tripod’s maximum load capacity to ensure it can hold your camera and lens securely.
When choosing a tripod, pay attention to the height and adjustability options. A tripod with adjustable legs and center column will allow you to position your camera at various heights, enabling you to frame the meteor shower from different perspectives. Look for quick-release mechanisms that allow for easy attachment and detachment of your camera.
In some cases, you may want to invest in additional accessories such as a tripod head or mount that offers more flexibility in terms of positioning and movement. A ball head or gimbal mount can provide smooth and precise adjustments, allowing you to track the meteor shower or easily pan across the night sky. These accessories are particularly useful if you plan to capture time-lapse sequences or if you want to follow the radiant point of the meteor shower.
Remember to adjust the tripod legs and securely lock them in place to avoid any unwanted movement during your long exposures. If possible, try to position the tripod on stable ground to minimize vibrations caused by wind or other external factors. You can also hang a weight, such as a camera bag, from the center column of the tripod to add extra stability.
By using a reliable tripod or mount, you can achieve sharp and steady images of meteor showers, even during long exposures. So, make sure to invest in a high-quality tripod that suits your needs and enhances your photography experience.
2.4 Optional Accessories
While not essential, there are some optional accessories that can enhance your experience and improve the quality of your meteor shower photographs. These accessories can help you overcome specific challenges and capture even more impressive shots.
Remote Shutter Release: Investing in a remote shutter release can be beneficial when photographing meteor showers. It allows you to trigger the camera without physically touching it, reducing camera shake and ensuring sharp images. This is especially useful when using longer exposure times.
Intervalometer: An intervalometer is a device that helps you automate your camera’s shutter release at set intervals. It can be used to create time-lapse sequences of the meteor shower, capturing multiple meteors in a single frame. This accessory is particularly useful if you want to create dynamic and captivating videos of the meteor shower.
External Battery Pack: If you plan on shooting for an extended period, consider using an external battery pack to ensure that your camera does not run out of power. Meteor showers can last for several hours, and having a reliable power source will prevent any interruptions in capturing the event.
Light Pollution Filter: Light pollution filters can help reduce the impact of artificial light on your images. They are designed to block specific wavelengths of light emitted by streetlights and other sources of light pollution. Using a light pollution filter can enhance the contrast and clarity of your meteor shower photographs, ensuring that the meteors stand out against the night sky.
Star Tracker or Equatorial Mount: For those looking to capture star trails along with the meteor shower, using a star tracker or equatorial mount can be a game-changer. These accessories compensate for the Earth’s rotation, allowing you to capture longer exposures without star trails. This can result in stunning images that showcase the movement of both the meteors and the stars.
Remember, these accessories are optional and may not be necessary for every photographer. Assess your specific needs and objectives before deciding to invest in additional gear. Ultimately, the goal is to equip yourself with the right tools that will aid in capturing the meteor shower in the most effective and creative way possible.
3. Camera Settings

When photographing a meteor shower, getting your camera settings right is crucial for capturing those elusive shooting stars. Here are some important camera settings to consider:
3.1 Manual Mode: Switch your camera to manual mode to have full control over the exposure settings. This allows you to adjust your settings according to the specific conditions of the meteor shower.
3.2 Focus and Aperture: Set your lens to manual focus and focus at infinity to ensure that the stars and meteors are sharp in your images. Use a wide aperture (low f-stop number) such as f/2.8 or wider to allow more light into your camera and capture the faint details of the meteors.
3.3 ISO and Shutter Speed: Start by setting your ISO to a high value, such as ISO 1600 or 3200, to increase the camera’s sensitivity to light. Adjust the shutter speed to a long exposure time, typically between 15 to 30 seconds, to capture the movement of the meteors across the sky. Experiment with different shutter speeds to find the right balance between capturing enough light and avoiding overexposure.
3.4 Long Exposure Noise Reduction: Enable the long exposure noise reduction feature on your camera. While this setting may increase the processing time between shots, it helps reduce the noise caused by long exposures, resulting in cleaner images.
Remember, these settings can vary depending on the specific conditions, such as the brightness of the meteors and the ambient light pollution. It’s important to test and adjust your settings throughout the shoot to achieve the desired results. By understanding and optimizing your camera settings, you’ll be well-equipped to capture the breathtaking beauty of a meteor shower in all its glory.
Note: Looking to explore more fascinating topics? Check out this article on Japanese mythology in anime and manga to dive into the captivating world of ancient legends and modern storytelling.
3.1 Manual Mode
When photographing a meteor shower, using manual mode on your camera gives you full control over the settings, allowing you to capture the best possible shots. Here are some key aspects to consider when using manual mode:
1. Exposure: Adjust the exposure settings manually to capture the meteors and the night sky accurately. Start by setting the ISO to a higher value, around 1600-3200, to make the camera more sensitive to light. This will help capture the faint trails of meteors. Experiment with different shutter speeds, typically between 10-30 seconds, to capture the movement of the meteors. However, be cautious about setting the shutter speed too long, as it may result in overexposed images or star trails.
2. White Balance: Set the white balance to “Daylight” or “Auto” to avoid any color casts caused by artificial lighting or moonlight. This will ensure that the colors in your images appear natural and true to life.
3. Focus: Switch your lens to manual focus mode and focus to infinity (∞) to capture the distant meteors and the stars in sharp focus. Using a bright star or a distant object as a reference point can help you achieve accurate focus in the dark sky.
4. RAW Format: Shoot in RAW format rather than JPEG to retain maximum image detail and flexibility during post-processing. RAW files capture more data, allowing you to make adjustments without significant loss in image quality.
Remember, the specific camera settings may vary depending on the conditions and the equipment you are using. Take test shots and make adjustments as necessary to achieve the desired results. By shooting in manual mode, you have complete control over the exposure, white balance, focus, and file format, enabling you to capture stunning images of meteors as they streak across the night sky. So grab your camera, set it to manual mode, and get ready to capture the magic of meteor showers with precision and creativity.
3.2 Focus and Aperture
When photographing a meteor shower, achieving proper focus and aperture settings is crucial for capturing sharp and well-defined shots. Manual focus is recommended to ensure precise control over your camera’s focus point. Switch to manual focus mode and set your lens to infinity (∞) or use the hyperfocal distance for increased depth of field. This will help ensure that both the meteors and the foreground elements are in focus.
Choosing the right aperture setting is another important aspect of capturing meteor showers. Opt for a wide aperture, such as f/2.8 or lower, to allow more light to enter the lens and capture the faint trails of the meteors. By using a wide aperture, you can also create a shallow depth of field, blurring the background and making the meteors stand out even more. Be aware that using a wide aperture may result in a narrower focal plane, so adjusting the focus accordingly is crucial for achieving sharp images.
It’s worth mentioning that some lenses might experience slight softness when shooting wide open. To mitigate this, you can try closing the aperture slightly, but be mindful not to go too small, as it may reduce the brightness of the meteors. Experiment with different aperture settings and test the results to find the optimal balance between sharpness and brightness in your meteor shower images.
By mastering focus and aperture settings, you can ensure that your meteor shower photographs are sharp, well-detailed, and visually captivating. So take the time to experiment and find the right combination for your specific gear and shooting conditions. Now, you’re ready to capture the magical streaks of light across the night sky during a meteor shower, filling your images with wonder and awe.
3.3 ISO and Shutter Speed
Setting the ISO and shutter speed correctly is crucial when photographing meteor showers. To capture the faint streaks of light, you’ll need to adjust these settings accordingly.
ISO: Start by setting your camera’s ISO to a high value, such as 1600 or 3200, to increase the camera’s sensitivity to light. Higher ISO values will make the stars and meteors appear brighter in your images. However, be cautious of setting the ISO too high, as it can introduce unwanted noise or graininess in your photos. Strike a balance between a high enough ISO to capture the meteors’ details and avoiding excessive noise.
Shutter Speed: When it comes to the shutter speed, you have a couple of options. You can opt for shorter exposures, around 10-30 seconds, to capture individual meteors as discrete streaks across the sky. This can result in dramatic shots that highlight the meteors’ paths. Alternatively, you can choose longer exposures, ranging from a few minutes to half an hour, to capture cumulative streaks of meteors in a single frame. This technique can create stunning images with multiple meteors captured in one photograph. However, keep in mind that longer exposures may cause the stars to trail and lose sharpness due to Earth’s rotation. Experiment with different shutter speeds to find the desired effect that suits your artistic vision.
Consider using a remote shutter release or the camera’s built-in timer to minimize camera shake during longer exposures. This will help ensure sharp and crisp images, especially in low-light conditions.
Remember, these settings may vary depending on the brightness of the meteor shower and the overall ambient light in your location. It’s important to test different combinations of ISO and shutter speed until you achieve the desired results. By fine-tuning these settings, you’ll be able to capture the essence and beauty of meteor showers in your photographs.
So, next time you head out to photograph a meteor shower, don’t forget to adjust your ISO and shutter speed to achieve the best possible results. Prepare your camera and gear, find a suitable location with minimal light pollution, and immerse yourself in the wonders of the night sky.
3.4 Long Exposure Noise Reduction
When photographing meteor showers, long exposure times are often necessary to capture the faint trails of meteors as they streak across the sky. However, long exposures can also introduce noise into your images, which can detract from the overall quality. To combat this issue, many cameras offer a feature called Long Exposure Noise Reduction (LENR).
LENR works by taking a second exposure with the shutter closed immediately after the initial long exposure. This second exposure captures only the noise present in the image. The camera’s processing engine then uses this second exposure to subtract the noise from the main image.
Enabling LENR can significantly reduce the amount of noise in your images, resulting in cleaner and more detailed photographs. However, it’s important to note that using LENR adds extra processing time to each exposure. The camera needs this additional time to capture the noise reference image and perform the necessary computations. This means that you may have to wait a few seconds or even minutes between each exposure, depending on the length of your exposure.
If you’re photographing a meteor shower with frequent meteors, enabling LENR may not be practical because you’ll have to wait too long between each shot. In such cases, you may choose to disable LENR and deal with noise reduction during post-processing using tools like noise reduction software.
Ultimately, the decision to use LENR or not will depend on the specific conditions and circumstances of your shoot. It’s recommended to experiment with and without LENR to see which approach produces the best results for your style of photography. Keep in mind that using LENR is not always necessary, especially if you’re shooting with a low ISO setting and using a camera with good noise performance.
4. Composition and Framing
When it comes to capturing stunning images of a meteor shower, composition and framing are key factors in creating visually appealing photographs. Here are some tips to help you make the most out of your composition:
4.1 Rule of Thirds: The rule of thirds is a basic principle of photography composition that can be applied to meteor shower photography as well. Imagine dividing your frame into a grid of nine equal sections by drawing two horizontal and two vertical lines. The key elements of your composition, such as the radiant point or a prominent meteor, should ideally be placed along these gridlines or at their intersections. This technique adds balance and visual interest to your shots.
4.2 Include Points of Interest: While capturing the meteors is the main goal, including other points of interest in your frame can enhance the overall composition. Look for elements like prominent landmarks, trees, or interesting foreground objects that can provide a sense of scale and context to your meteor shower images. These elements can make your photographs more captivating and unique.
Experiment with different angles and perspectives to find the most visually pleasing composition. Consider framing the scene with a wide-angle lens to capture the vastness of the night sky and the meteor streaks across it. Remember, composition is subjective, so trust your instincts and creative vision to capture the meteor shower in a way that reflects your unique perspective.
By using the rule of thirds and including points of interest, you can create visually appealing compositions that go beyond just capturing meteor streaks. So, take the time to experiment and find the perfect framing that brings out the magic of the meteor shower in your photographs.
Please, note that capturing meteor showers can be challenging due to their unpredictable nature and fast-moving meteors. However, by following these composition and framing techniques, you can greatly improve your chances of capturing captivating and visually stunning images of these celestial events. So, don’t be afraid to get creative and let your artistic vision lead the way.
4.1 Rule of Thirds
When it comes to composition in meteor shower photography, one technique that can help create visually appealing images is the rule of thirds. The rule of thirds is a fundamental principle of photography that involves dividing the frame into a grid of nine equal sections using two horizontal and two vertical lines. This creates four intersecting points known as “power points,” where the viewer’s eye naturally tends to rest.
To apply the rule of thirds in your meteor shower photos, you can position the radiant point, where the meteors appear to originate, along one of the vertical lines. This helps create a sense of balance and allows the meteors to travel diagonally across the frame, adding a dynamic element to your composition. Placing the radiant point off-center also leaves space for the meteors to trail across the frame, leading the viewer’s eye towards them.
Additionally, you can use the rule of thirds to position key elements of your foreground or background, such as trees, mountains, or other points of interest, along the gridlines or at the intersecting points. This creates a visually pleasing and well-balanced composition that draws attention to both the meteor shower and the surrounding landscape.
Remember, the rule of thirds is a guideline, and breaking it creatively can also result in captivating compositions. Experimentation and exploration of different framing options can lead to unique and exciting photographs. So, embrace the rule of thirds as a starting point, but don’t be afraid to step outside of its boundaries and let your creativity shine through.
Now that you understand the importance of the rule of thirds in meteor shower photography, you can apply this technique to compose visually stunning images that capture both the magic of the meteor shower and the beauty of the surrounding landscape. So, grab your camera, find an optimal location, and let the rule of thirds guide you in creating captivating compositions that truly stand out.
4.2 Include Points of Interest
When composing your shots during a meteor shower photography session, it is important to include points of interest in your frame. These points of interest can add depth, context, and visual appeal to your meteor shower images. Here are a few tips on including points of interest in your compositions:
1. Foreground Elements: Look for interesting foreground elements to include in your frame. This could be a tree, a rock formation, a body of water, or any other element that can add visual interest. The foreground element can act as an anchor for your composition, leading the viewer’s eye towards the meteor shower in the sky. Make sure to position these elements in the frame in a way that complements the overall composition.
2. Silhouettes: Silhouettes can create stunning and dramatic images during a meteor shower. Consider positioning yourself in such a way that a recognizable silhouette, such as a person or a tree, is set against the sky where the meteors will be visible. This can add a sense of scale and drama to your photos.
3. Iconic Landmarks: If you are photographing the meteor shower in a location that has iconic landmarks, incorporating them into your composition can create memorable images. The juxtaposition of the meteor shower with recognizable landmarks can add a unique perspective to your photos. Experiment with different compositions to find the perfect balance between the meteor shower and the landmark.
4. Astrophotography Techniques: To enhance the visual impact of your meteor shower images, you can explore astrophotography techniques such as star trails or capturing the Milky Way. These techniques can add a sense of motion and grandeur to your photos. By including these elements along with the meteor shower, you can create truly breathtaking images.
Remember to always keep your composition balanced and visually pleasing. Be mindful not to overcrowd the frame with too many elements, as it can distract from the main subject – the meteor shower. Including points of interest in your compositions will not only enhance the overall visual appeal of your images but also provide a unique perspective on these celestial events. So, get creative, experiment, and capture the beauty of meteor showers with a touch of artistic flair.
5. Patience and Timing

When photographing a meteor shower, patience and timing are key to capturing the perfect shot. Meteor showers can have periods of intense activity followed by lulls, so it’s important to be prepared and alert throughout the entire event. Set up your camera and tripod in a comfortable position, ensuring that you have a clear view of the sky and the radiant point where the meteors originate. It’s best to start shooting before the predicted peak time as meteors can appear unpredictably. This will give you a better chance of capturing those elusive shooting stars. Be prepared to wait for extended periods as meteors can be sporadic, with minutes or even hours between each sighting. It’s important to stay patient and persistent, as capturing that one incredible meteor can make all the waiting worthwhile.
Timing is also important when it comes to the length of your exposures. Experiment with different shutter speeds to find the optimum exposure time. This will depend on various factors such as the brightness of the meteor shower, the ambient light conditions, and the speed of the meteors. Start with a shutter speed of around 15 to 30 seconds and adjust accordingly. Remember to review your images regularly to check for any overexposure or underexposure, making the necessary adjustments as you go.
As you patiently wait for meteors to streak across the sky, consider the composition of your shots. You may want to capture the entire scene with a wide-angle lens, showcasing the vastness of the night sky and the surrounding landscape. Alternatively, you can use a telephoto lens to zoom in on the radiant point or to focus on specific meteors. Experiment with different compositions and framing techniques to create visually compelling images. Remember, capturing a meteor shower is not just about the meteors themselves, but also about creating a captivating photograph that tells a story.
So, arm yourself with patience, stay alert, and time your exposures and compositions correctly. With a bit of luck and perseverance, you’ll be rewarded with stunning images of meteor showers that will leave viewers in awe of the beauty of the night sky.
Conclusion

In conclusion, photographing meteor showers is an exciting and rewarding experience for any photography enthusiast. By planning ahead, you increase your chances of capturing stunning images that showcase the beauty and magic of these celestial events.
Researching the specific meteor shower you plan to photograph helps you understand its peak times and rates, allowing you to be prepared and in the right place at the right time. Scouting for the perfect location away from light pollution ensures clear and dark skies for optimal visibility of the meteors. Checking the weather forecast is crucial to ensure clear skies, as clouds can obstruct your view of the meteors.
Equipping yourself with the right gear, including a suitable camera, lenses, tripod, and optional accessories, enables you to capture sharp and detailed shots of the meteor shower. Understanding and adjusting camera settings, such as shooting in manual mode, adjusting focus, aperture, ISO, and shutter speed, helps you capture the meteors effectively.
When it comes to composition, following the rule of thirds and including points of interest in your frame adds visual appeal and storytelling elements to your meteor shower images. Patience and timing are key, as meteor showers can have moments of intense activity followed by lulls. Being prepared to wait and capture multiple exposures increases the likelihood of capturing that perfect shot.
Remember, meteor showers are natural phenomena that provide awe-inspiring displays in the night sky. Take the time to fully immerse yourself in the experience, appreciating the beauty and wonder of the universe as you capture your photographs.
So, grab your camera, plan ahead, and venture out to photograph a meteor shower that will leave you with breathtaking images and lasting memories. Happy shooting!
For more fascinating insights into celestial wonders, you may be interested in learning about the /mysterious-origins-inca-civilization/ or delving into the mythology and symbolism of the /unraveling-mythology-symbolism-ursa-major/.
Frequently Asked Questions

1. When is the best time to photograph a meteor shower?
The best time to photograph a meteor shower is during its peak activity, which can vary for each shower. Research the specific meteor shower you plan to photograph to determine its peak dates and times.
2. Do I need a special camera to capture meteor showers?
You don’t necessarily need a special camera, but a camera with manual mode capabilities will give you greater control over your settings. DSLR or mirrorless cameras are commonly used for astrophotography due to their ability to interchange lenses.
3. What lenses are recommended for photographing meteor showers?
Wide-angle lenses are popular choices for capturing meteor showers as they allow you to include a larger portion of the night sky. A lens with a focal length between 14mm and 24mm is ideal for capturing the expansive view.
4. How should I focus my camera for meteor shower photography?
Switch your lens to manual focus and set it to infinity. You can also use the hyperfocal distance technique to ensure that both the foreground and the meteors are in focus.
5. What camera settings should I use for photographing meteor showers?
Set your camera to manual mode, choose a wide aperture (around f/2.8 or lower), use a high ISO (around 1600-3200), and select a shutter speed between 10-30 seconds to capture the meteors’ trails.
6. Should I use long exposure noise reduction?
Using long exposure noise reduction will help reduce the noise in your images caused by long exposures. However, keep in mind that it will also increase the time between shots as the camera applies noise reduction processing.
7. How can I compose my shots for meteor shower photography?
Using the rule of thirds can create visually pleasing compositions. Additionally, consider including points of interest such as trees, mountains, or other elements to add depth and interest to your photographs.
8. Do I need a tripod for photographing meteor showers?
Yes, a sturdy tripod is essential for capturing sharp and steady images during long exposures. It will help eliminate camera shake and ensure your photos come out tack sharp.
9. Can I photograph meteor showers with a smartphone?
While smartphones have improved camera capabilities, they are not ideal for capturing meteor showers due to their limited manual control and lens capabilities. Consider using a DSLR or mirrorless camera for better results.
10. How long should I be patient to capture meteor showers?
Meteor showers can have bursts of activity where several meteors cross the sky within a few minutes. However, patience is key. Set up your gear early, be prepared to wait for extended periods, and give yourself enough time to capture the magic of these celestial events.
References
- Photographing Meteors, Fireballs and Meteor Showers
- Meteor Showers 2023: The Definitive Photography Guide
Frequently Asked Questions

1. How often do meteor showers occur?
Meteor showers occur regularly throughout the year, with some showers happening annually while others occur at specific intervals of several years or more.
2. What causes meteor showers?
Meteor showers are caused by the Earth passing through the debris left behind by comets or asteroids. When these particles enter the Earth’s atmosphere, they burn up and create streaks of light in the sky.
3. What is the best time to photograph a meteor shower?
The best time to photograph a meteor shower is usually during the peak of its activity, which is when the highest number of meteors can be seen. It’s also ideal to capture them during the darkest hours of the night when the sky is free from light pollution.
4. How can I find the exact peak time of a meteor shower?
You can find the specific peak time of a meteor shower by referring to astronomical resources, such as websites or apps that track celestial events. These sources will provide information on the exact dates and times when the shower is expected to be at its most active.
5. Can I use a smartphone to photograph meteor showers?
While smartphones have improved in terms of camera quality, they may not be the best option for capturing meteor showers. The limited manual control and smaller sensors can result in lower quality images compared to using a dedicated camera.
6. How can I minimize camera shake when photographing meteor showers?
To minimize camera shake, it’s essential to use a stable tripod or mount to keep your camera steady during long exposure shots. Additionally, using a remote shutter release or the camera’s built-in timer can help reduce any unintentional camera shake when pressing the shutter button.
7. Should I use autofocus or manual focus for meteor shower photography?
It is recommended to use manual focus when photographing meteor showers. Autofocus may struggle to lock onto the fast-moving meteors, resulting in blurry images. By manually focusing on a distant object, such as a star, you can ensure that the meteors will be captured sharply.
8. How long should I set my shutter speed for meteor shower photography?
For meteor shower photography, setting a long shutter speed is crucial to capture the trails created by the meteors. A typical starting point is around 15-30 seconds, but you may need to adjust this depending on the brightness of the meteors and the amount of ambient light in the sky.
9. What can I do if I live in an area with high light pollution?
If you live in an area with high light pollution, it can significantly impact the visibility of meteor showers. To overcome this, consider traveling to a darker location that is away from city lights. This will allow you to capture clearer and more vibrant images of the meteor shower.
10. Are there any safety precautions I should take when photographing meteor showers?
When photographing meteor showers, it’s important to dress appropriately for the weather conditions and be mindful of your surroundings. It is also advisable to bring a flashlight for navigating in the dark, especially if you are working in a remote location. Always prioritize your safety and be aware of any potential hazards in the area.

