Welcome to the World of Eclipse Photography: Unveiling the Secrets of Capturing Stunning Photos During Solar and Lunar Eclipses
Eclipse photography opens up a mesmerizing realm of celestial wonders, where the sun, moon, and Earth dance in perfect alignment, enchanting us with their breathtaking beauty. Are you ready to immerse yourself in this extraordinary universe and capture the magic on camera? In this comprehensive guide, we will explore the various types of eclipses and how they occur, equip you with essential tips for preparing and planning your shoot, divulge camera settings and techniques to ensure perfect exposures, and unveil creative ideas and compositions to unleash your artistic vision. As we journey together through the captivating realm of eclipse photography, prepare to be inspired and awestruck by the captivating power of these celestial phenomena. Get ready to embark on an adventure that will forever transform the way you view our universe.
Contents
- Understanding Eclipses
- Preparing for the Shoot
- Camera Settings and Techniques
- Composition and Creative Ideas
- Tips for a Successful Shoot
- Post-Processing and Editing
- Safety Precautions
- Conclusion
-
Frequently Asked Questions
- What is the difference between a solar eclipse and a lunar eclipse?
- How often do solar eclipses occur?
- Can I photograph an eclipse with my smartphone?
- Are there any safety precautions I should take during an eclipse?
- What gear do I need for eclipse photography?
- How can I plan the best location for photographing an eclipse?
- Why is shooting in manual mode important for eclipse photography?
- What are some composition techniques for eclipse photography?
- How can I edit and enhance my eclipse photos?
- Do I need specialized filters for lunar eclipses?
- References
-
Frequently Asked Questions
- What is a total solar eclipse?
- How often do total solar eclipses occur?
- Can I photograph a solar eclipse with my smartphone?
- Do I need special equipment to photograph an eclipse?
- Can I use my regular camera lens to photograph an eclipse?
- How can I ensure my eyes are protected during an eclipse?
- What is the best time of day to photograph an eclipse?
- How can I capture the corona during a total solar eclipse?
- Can I use manual focus during an eclipse?
- How can I create a unique composition during an eclipse?
- References
- Read More
Understanding Eclipses
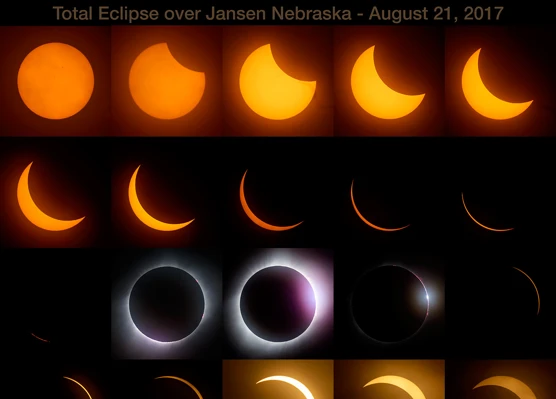
Eclipses are celestial events that captivate both astronomers and photography enthusiasts alike. Understanding eclipses requires delving into the intricacies of their occurrence and the different types that exist. There are two main types of eclipses: solar and lunar. Solar eclipses occur when the moon passes between the Earth and the sun, casting a shadow on Earth’s surface. On the other hand, lunar eclipses happen when the Earth comes between the sun and the moon, causing the moon to fall into Earth’s shadow. To comprehend the mechanics of eclipses, it is crucial to grasp the alignment of the sun, moon, and Earth. Solar eclipses can be further categorized into three types: total, partial, and annular. During a total solar eclipse, the moon completely obscures the sun, creating a breathtaking display of the sun’s corona. In contrast, during a partial solar eclipse, the moon only partially covers the sun, resulting in a mesmerizing crescent-shaped sun. An annular solar eclipse occurs when the moon is at a far distance from Earth, causing it to appear smaller and not fully cover the sun, resulting in a luminous ring-like shape known as an “annulus.” Lunar eclipses display hues of red as Earth’s atmosphere filters sunlight, giving the moon an ethereal appearance. Understanding the nature and intricacies of eclipses will provide a solid foundation for capturing their awe-inspiring beauty through the lens of your camera. (Source: role of Mesopotamian mythology)
Types of Eclipses
Understanding the different types of eclipses is essential for capturing their mesmerizing beauty during a photography session. There are two main types of eclipses: solar and lunar.
Solar Eclipses:
1. Total Solar Eclipse: This occurs when the moon completely blocks the sun, casting a shadow on the Earth’s surface. It is considered the most dramatic and rarest type of solar eclipse. Photographers have the opportunity to capture the breathtaking moment when the sun’s corona, a luminous halo, becomes visible.
2. Partial Solar Eclipse: In this type of eclipse, the moon only partially covers the sun, creating a mesmerizing crescent shape. It is more common than a total solar eclipse and offers photographers a chance to capture unique and intriguing compositions.
3. Annular Solar Eclipse: During an annular solar eclipse, the moon is at a distance from Earth that makes it appear smaller than the sun. As a result, the moon doesn’t fully cover the sun, leaving a ring of light around its edges. Photographing this type of eclipse provides an opportunity to capture the captivating “ring of fire” effect.
Lunar Eclipses:
1. Total Lunar Eclipse: A total lunar eclipse occurs when the Earth passes directly between the sun and the moon, casting a shadow over the moon. During this event, the moon takes on a reddish hue known as a “blood moon.” Photographers can capture this stunning phenomenon and experiment with long exposure techniques to create unique and ethereal images.
2. Partial Lunar Eclipse: Similar to a partial solar eclipse, a partial lunar eclipse occurs when only a portion of the moon enters Earth’s shadow. Photographers can capture the interesting contrast between the illuminated and shadowed parts of the moon.
3. Penumbral Lunar Eclipse: This type of eclipse is subtle and often goes unnoticed. During a penumbral lunar eclipse, the moon passes through Earth’s outer shadow, resulting in a slight dimming of its brightness. Although less dramatic, photographers can still capture the delicate beauty of this celestial event.
Understanding the distinctions between these types of eclipses will enable photographers to plan and prepare accordingly, ensuring they are equipped with the right gear and techniques to capture the magic of the celestial dance. (Source: astrological house differences)
How Eclipses Occur
| Solar Eclipses |
| During a solar eclipse, the moon comes between the Earth and the sun, causing a momentary blocking of the sun’s light. The moon’s shadow is cast upon the Earth’s surface, creating a captivating celestial event. The alignment of the sun, moon, and Earth must be precise for a solar eclipse to occur. |
| Lunar Eclipses |
| Lunar eclipses occur when the Earth is positioned between the sun and the moon. The Earth’s shadow is then cast onto the moon, causing it to darken or take on a reddish hue. This phenomenon happens when the sun, Earth, and moon are perfectly aligned. |
| Umbra and Penumbra |
| During a solar eclipse, two distinct shadow regions are created: the umbra and the penumbra. The umbra is the region where the sun is completely blocked by the moon, resulting in a total eclipse. In contrast, the penumbra is the outer region where the sun is only partially obscured by the moon, leading to a partial eclipse. |
| Phases of a Lunar Eclipse |
| A lunar eclipse goes through various stages. It begins with the penumbral phase, where the moon enters the Earth’s penumbra, causing a subtle dimming. Next is the partial phase, where a portion of the moon is inside the Earth’s umbra, resulting in a noticeable darkening. Lastly, the total phase occurs when the entire moon is within the Earth’s umbra, creating a breathtaking and mystical red glow. |
Understanding how eclipses occur is essential for photographers aiming to capture these celestial events. Whether it is a solar eclipse, with the moon obstructing the sun’s light, or a lunar eclipse, with the Earth casting its shadow on the moon, the alignment of the celestial bodies plays a crucial role. During a solar eclipse, photographers can witness the shadow of the moon moving across the Earth’s surface, capturing the ephemeral beauty of this event. In the case of a lunar eclipse, the moon takes on various shades, ranging from a dimming effect in the penumbral phase to a reddish hue during totality. By understanding the different phases and shadow regions of eclipses, photographers can plan their shots meticulously to capture the most enchanting and awe-inspiring moments. (Source: famous Ophiuchus personalities in history)
Preparing for the Shoot

Before immersing yourself in the world of eclipse photography, it’s essential to adequately prepare for the shoot to ensure a successful and unforgettable experience. Researching the upcoming eclipse is paramount to understanding its path, duration, and other essential details. This knowledge will help you plan the perfect shooting location, whether it be a scenic landscape, an iconic monument, or a wide-open field. Consider factors such as accessibility, nearby obstacles, and the desired perspective. Equip yourself with the right gear and equipment, including a sturdy tripod, a telephoto lens, and solar filters to protect your eyes and camera. Familiarize yourself with the camera settings you’ll need to utilize during the shoot, such as shooting in manual mode to have complete control over exposure. Planning ahead will ensure that you are fully prepared to capture the awe-inspiring beauty of the eclipse and make the most out of this once-in-a-lifetime event.
Research the Eclipse
Researching the eclipse is a crucial step that will greatly enhance the success of your photography endeavor. To effectively capture the eclipse, consider engaging in the following activities:
1. Study the Eclipse Path: Investigate the path the eclipse will take across the sky. This information will help you determine the optimal location for your shoot and the duration of the eclipse at that location.
2. Check Eclipse Timing: Make sure to know the exact date and time of the eclipse in your location. Timing is essential, as it determines the lighting conditions and the duration of the eclipse phase.
3. Learn about Eclipse Phase: Familiarize yourself with the different phases of the eclipse, such as the partial phase, total phase, or annular phase. This knowledge will enable you to plan your shots accordingly and anticipate the best moments to capture.
4. Consult Astronomical Resources: Utilize reputable astronomical resources, such as NASA’s official website or astronomy apps, to gather detailed information about the eclipse. These sources often provide valuable insights, including the exact times of each phase and the magnitude of the eclipse.
5. Access Weather Forecasts: Keep an eye on weather forecasts for your shooting location. Clear skies are essential for capturing sharp and vibrant eclipse photographs. If the weather condition seems unfavorable, consider adjusting your shooting location accordingly.
By thoroughly researching the eclipse, you will be equipped with the knowledge needed to plan and prepare effectively, ensuring a successful and rewarding photography experience.
Planning the Location
When it comes to eclipse photography, planning the location is a crucial step in ensuring a successful shoot. Here are some key factors to consider when selecting the ideal spot for capturing the eclipse in all its glory:
1. Path of Totality: If you are aiming to photograph a total solar eclipse, it is essential to position yourself within the path of totality. This is the narrow strip on Earth’s surface where the moon will completely block the sun. Research the path of totality beforehand and determine the nearest accessible location from your area.
2. Clear Skies: Check weather forecasts and choose a location with a higher chance of clear skies during the eclipse. Clouds can obscure the view and hinder your ability to capture the celestial event effectively. Consider areas with generally clear weather conditions or be prepared to travel to a better location if needed.
3. Scenic Background: Look for a visually appealing backdrop that can enhance the overall composition of your eclipse photographs. Mountains, bodies of water, or iconic landmarks can add depth and interest to your images. Scout potential locations in advance and visualize how the eclipse will align with your desired background elements.
4. Accessibility: Ensure that your chosen location is easily accessible and allows you to set up your equipment comfortably. Consider factors such as parking availability, proximity to amenities, and any potential crowds that may gather to witness the eclipse.
5. Research Local Regulations: Some locations may have restrictions or regulations concerning photography or public access, especially if you plan to shoot from private properties or national parks. Familiarize yourself with local laws and guidelines to avoid any conflicts or obstacles on the day of the eclipse.
Remember, planning the location in advance allows you to be in the right place at the right time, maximizing your chances of capturing stunning eclipse photographs. With careful consideration of the path of totality, weather conditions, scenic backgrounds, accessibility, and local regulations, you can ensure a seamless and rewarding eclipse photography experience.
Gear and Equipment
When it comes to capturing stunning eclipse photos, having the right gear and equipment is essential. Here’s a comprehensive list of what you’ll need to ensure a successful shoot:
1. DSLR or Mirrorless Camera: Invest in a good quality camera that allows manual control of settings. DSLRs and mirrorless cameras are popular choices among photographers.
2. Telephoto Lens: A telephoto lens with a long focal length will help you capture the intricate details of the eclipse. Look for a lens with a focal length of at least 200mm or more.
3. Tripod: A sturdy tripod is crucial for keeping your camera stable during long exposures. Choose a tripod that can support the weight of your camera and lens.
4. Solar Filters: To protect your eyes and camera from the intense sunlight during a solar eclipse, use solar filters designed specifically for photography. These filters block harmful rays and allow you to capture the eclipse safely.
5. Remote Shutter Release: Using a remote shutter release eliminates camera shake when triggering the shutter. This is especially important when shooting long exposures or during a lunar eclipse.
6. Extra Batteries and Memory Cards: Make sure to carry spare batteries and memory cards to avoid running out of power or storage space during the shoot.
7. Lens Cleaning Kit: Keep your lens clean and free from dust or smudges using a lens cleaning kit. This ensures sharp and clear images.
8. Camera Bag and Accessories: Invest in a durable camera bag to safely store and carry your gear. Additionally, consider carrying a flashlight, lens hoods, and lens filters for added versatility.
Remember to familiarize yourself with your gear and practice using it before the actual eclipse event. This will help you feel confident and prepared when capturing this awe-inspiring moment in time.
Camera Settings and Techniques
Capturing stunning eclipse photographs requires a solid understanding of camera settings and techniques. Shooting in manual mode is essential to have complete control over your exposure settings. Start by setting your aperture to a medium value, around f/8 to f/11, to achieve a balance between sharpness and depth of field. Experiment with different shutter speeds to capture the movement and details of the eclipse. Adjusting your ISO will help you achieve the desired level of sensitivity to light, keeping it as low as possible to minimize noise. Using filters is highly recommended for eclipse photography, especially for safely capturing the intense brightness of the sun. A solar filter designed specifically for photography will protect your camera and lenses while allowing you to capture the eclipse with clarity and detail. Additionally, consider using a tripod to ensure stability and reduce camera shake during long exposure shots. Mastering these camera settings and techniques will unlock the full potential of your eclipse photography, allowing you to preserve the awe-inspiring beauty of these celestial events for eternity.
Shoot in Manual Mode
When capturing eclipse photography, shooting in manual mode is crucial for achieving optimal results. Manual mode provides complete control over the camera settings, allowing you to make adjustments based on the unique lighting conditions of the eclipse. Here are some key considerations when shooting in manual mode:
1. Shutter Speed: Select an appropriate shutter speed to control the amount of light entering the camera. During a solar eclipse, start with a fast shutter speed to capture the sun’s details and prevent overexposure. For a lunar eclipse, a longer shutter speed may be needed to capture the moon’s dimmer light.
2. Aperture: Adjust the aperture to control the depth of field and the amount of light entering the lens. Use a smaller aperture (higher f-number) during a solar eclipse to capture sharper details and reduce the risk of overexposing the image. During a lunar eclipse, a wider aperture (lower f-number) can be used to capture more light and enhance the moon’s appearance.
3. ISO: Set the ISO to control the camera’s sensitivity to light. Start with a low ISO value, such as 100 or 200, to minimize noise and ensure optimal image quality. Adjust the ISO as needed depending on the lighting conditions and desired exposure.
4. Focus: Manually focus your lens to ensure sharpness and clarity in your photos. Autofocus may struggle during an eclipse due to the limited amount of light. Use live view and magnify the image to fine-tune the focus manually. Consider using a wide-angle lens for solar eclipses and a telephoto lens for lunar eclipses to capture more details.
5. Exposure Compensation: Experiment with exposure compensation to achieve the desired exposure level. Bracketing your shots – taking multiple exposures at different settings – can help you capture a wider range of details and allow for more flexibility in post-processing.
By shooting in manual mode, you have complete control over every aspect of your camera’s settings, ensuring that you capture the eclipse in its truest form. It may take some practice and experimentation to find the perfect settings, but the results will be well worth it.
Aperture, Shutter Speed, and ISO
Capturing stunning eclipse photography requires a solid understanding of the interplay between aperture, shutter speed, and ISO settings. These three elements directly affect the exposure, sharpness, and overall quality of your images.
Aperture: Adjusting the aperture allows you to control the amount of light entering the camera through the lens. During an eclipse, using a smaller aperture (higher f-number) like f/8 or f/11 will ensure a larger depth of field, keeping both the foreground and the celestial event in focus. This is especially useful when incorporating foreground elements such as trees or buildings to add depth and context to your photos.
Shutter Speed: The shutter speed determines the duration of time your camera’s sensor is exposed to light. When photographing an eclipse, it’s crucial to use a fast shutter speed to avoid overexposure. Start with a faster shutter speed, around 1/2000th of a second, and adjust accordingly based on the brightness of the sun or moon. A fast shutter speed will help capture sharp details and avoid motion blur caused by the Earth’s rotation.
ISO: ISO refers to the sensitivity of your camera’s image sensor to light. For eclipse photography, it’s best to keep the ISO as low as possible to reduce noise in your images. Start with a low ISO setting, around ISO 100 or 200, and increase it only if necessary. This will ensure that the images have minimal graininess and retain maximum detail.
Finding the perfect balance between these three settings is crucial for achieving well-exposed and sharp eclipse photographs. Experiment with different combinations based on the lighting conditions and your desired artistic effect. Keep in mind that the ideal settings may vary depending on the specific eclipse and your shooting location. Don’t hesitate to review and adjust your settings throughout the shoot to accommodate changing lighting conditions.
Using Filters
One of the essential techniques in eclipse photography is the use of filters to enhance the quality of your images and protect your equipment. Filters serve several purposes during an eclipse shoot, such as reducing the intensity of sunlight, enhancing the contrast and details of the eclipse, and minimizing lens flare. Below are some types of filters that can be utilized in eclipse photography:
1. Neutral Density (ND) Filters: ND filters are designed to reduce the amount of light that enters the camera, allowing you to use slower shutter speeds or wider apertures without overexposing the image. They come in various strengths, such as ND2, ND4, or ND8, and are particularly useful during the partial phases of a solar eclipse when the sun’s brightness can be overwhelming.
2. Solar Filters: Solar filters are specifically designed for photographing the sun safely during a solar eclipse. These filters block out harmful UV and infrared rays, protecting both your eyesight and camera sensor. Make sure to use a certified solar filter that meets the necessary safety requirements to prevent any damage to your gear.
3. Polarizing Filters: Polarizing filters help reduce glare and reflections, enhancing color saturation and contrast in your images. They are especially useful when photographing lunar eclipses or during the partial phases of a solar eclipse when you want to capture the subtle details on the moon’s surface or the sun’s corona.
4. Graduated Neutral Density (GND) Filters: GND filters are useful for balancing exposure when capturing landscapes or incorporating foreground elements during a solar eclipse. These filters have a gradient of darkness that helps darken the bright sky while maintaining proper exposure for the foreground, resulting in well-balanced images.
It’s important to select high-quality filters and ensure they are properly attached to your camera lens. Experimenting with different combinations of filters can help you achieve the desired effect and add an artistic touch to your eclipse photos. Remember to always check the clarity of the filters and clean them regularly to avoid any unwanted artifacts or softness in your images.
Composition and Creative Ideas
When it comes to eclipse photography, composition is key to creating visually striking images that leave a lasting impression. By incorporating creative ideas and elements into your shots, you can elevate your photographs from ordinary to extraordinary. One effective technique is to include foreground elements that add depth and context to your images. This could be anything from a landscape feature, such as a tree or a mountain, to architectural structures or even people, watching in awe as the eclipse unfolds. Silhouettes are another powerful tool that can be used to create dramatic and captivating compositions. By positioning your subject in front of the eclipsed sun or moon, you can capture their outline against the radiant beauty of the celestial event. Additionally, experimenting with long exposure techniques can yield stunning results. By using a tripod and a longer shutter speed, you can create mesmerizing images that depict the path of the celestial bodies as they move across the sky. Whether you choose to embrace a minimalist approach with a focused subject against a darkened backdrop or seek to capture the grandeur of the eclipse in its entirety, the possibilities for creative compositions are endless. So, grab your camera, unleash your imagination, and let your artistic vision guide you towards capturing unforgettable eclipse photographs.
Foreground Elements
When capturing eclipse photography, incorporating foreground elements can add depth and context to your images, creating a visually captivating composition. Here are some tips to effectively utilize foreground elements in your eclipse photos:
- Select a compelling foreground: Look for interesting objects such as trees, rocks, or buildings that can enhance the overall composition and provide a sense of scale to the eclipse. Experiment with different angles and perspectives to find the perfect foreground element.
- Consider the eclipse’s position: Take into account the position of the eclipse in relation to the foreground element. Frame your shot in a way that aligns the eclipse with the object to create a seamless integration.
- Use leading lines: Utilize natural lines or objects in the foreground, such as roads or rivers, to guide the viewer’s eye towards the eclipse. Leading lines can create a sense of movement and guide the viewer’s gaze to the main subject.
- Play with depth of field: Experiment with different aperture settings to control the depth of field and achieve the desired focus on both the foreground element and the eclipse. Using a larger aperture (smaller f-number) can create a shallow depth of field, drawing attention to the foreground while keeping the eclipse in focus.
- Find balance: Ensure a harmonious balance between the foreground element and the eclipse. Avoid overpowering the eclipse with a dominant foreground or vice versa. Strive for a visually pleasing composition where both elements complement each other.
By incorporating well-chosen foreground elements, you can elevate the visual impact of your eclipse photographs, telling a more compelling and immersive story. Experiment with different compositions and unleash your creativity to capture truly mesmerizing images.
Using Silhouettes
Silhouettes can add a touch of drama and mystique to your eclipse photography. By strategically placing objects or people in the foreground, you can create a stunning juxtaposition between the silhouetted figures and the celestial event unfolding in the background. When using silhouettes, the key is to ensure that the objects or people are backlit, meaning the main light source is behind them. This can be achieved by positioning yourself in a way that allows the sun or moon to be in the frame but not directly visible. Silhouettes work particularly well during a partial solar eclipse, as the crescent-shaped sun adds a unique and captivating element to the composition. Experiment with different subjects for your silhouettes, such as trees, buildings, or even wildlife. Pay attention to the shape and form of the silhouettes, as they can greatly impact the overall visual impact of the image. Keep in mind that a well-defined and recognizable silhouette can create a stronger sense of intrigue and storytelling. To enhance the contrast between the foreground and the sky, consider underexposing the image slightly to ensure the silhouette remains dark and distinct. Remember to pay attention to the composition and balance within the frame, using the rule of thirds or leading lines to guide the viewer’s eye. Using silhouettes in your eclipse photography can elevate your images to a whole new level, injecting a sense of artistry and narrative into your captures.
Long Exposure Techniques
Long Exposure Techniques: Long exposure techniques in eclipse photography can produce stunning and ethereal effects that add a touch of magic to your images. By extending the exposure time, you can capture the movement of the moon or the sun during an eclipse, resulting in captivating streaks or trails of light. One popular long exposure technique is to use a tripod to keep your camera steady and capture prolonged exposures without any camera shake. This is especially important when shooting in low light conditions during a lunar eclipse or when photographing the corona during a total solar eclipse. To achieve longer exposures, you can use a neutral density (ND) filter, which reduces the amount of light entering the camera, allowing for longer shutter speeds. This enables you to capture the gradual changes in the moon’s shadow or the magnificent corona during a solar eclipse. Experiment with different exposure times to find the perfect balance, ensuring that the highlights of the eclipse are properly exposed while still capturing the motion and fluidity of the event. Remember to use a remote shutter release or the camera’s built-in self-timer to prevent any camera shake caused by pressing the shutter button. Long exposure techniques open up a world of creative possibilities, allowing you to capture the mystical and otherworldly nature of eclipses in a unique and mesmerizing way.
Tips for a Successful Shoot
When it comes to eclipse photography, preparation and attention to detail are key for a successful shoot. Here are some valuable tips to ensure that you capture stunning images of these celestial events. Arrive early at your chosen location to allow ample time for setting up your equipment, scouting the surroundings, and finding the perfect vantage point. Being well-prepared with the right gear is crucial: bring extra batteries, memory cards, and a tripod for stability. While shooting, it’s essential to maintain focus and sharpness, especially during low-light conditions. Consider bracketing your exposures to capture a range of image brightness and ensure you achieve the desired results. Using a remote shutter release can minimize camera shake and help you capture clear and crisp images. Remember, practice makes perfect, so don’t be discouraged if your initial shots don’t turn out as expected. Learn from each experience and continue refining your techniques. With patience and perseverance, you’ll be well on your way to capturing breathtaking images of these magical cosmic phenomena.
Arrive Early and Be Prepared
Arriving early and being prepared are essential elements for a successful eclipse photography shoot. By arriving early, you can familiarize yourself with the surroundings, find the best vantage point, and set up your equipment without feeling rushed. It’s important to scout the location beforehand to ensure that you have a clear view of the sky and any potential foreground elements you may want to include in your composition. Additionally, arriving early allows you to check the weather conditions and make any necessary adjustments to your shooting plan.
Being prepared goes beyond just showing up early. It involves having all the necessary gear and equipment ready to go. Make sure your camera batteries are fully charged and have additional batteries on hand. Bring extra memory cards to accommodate the large number of photos you’ll be taking. It’s also a good idea to have lens cleaning supplies in case your lenses get dirty.
While being prepared with the right equipment is important, don’t forget to also prepare yourself mentally and physically. Eclipse photography can be a physically demanding activity, especially if you’re hiking to a remote location. Make sure you have comfortable shoes, appropriate clothing for the weather conditions, and enough food and water to keep you energized throughout the day. Being mentally prepared involves having a clear plan in mind for the types of shots you want to capture and any specific techniques you want to try. Visualize the shots you want to achieve and be ready to adapt and improvise as the eclipse unfolds.
By arriving early and being prepared, you position yourself for success and increase your chances of capturing stunning eclipse photographs. So, set your alarm clock, pack your gear the night before, and embark on your photography adventure with confidence and excitement. (Source: astrological house differences)
Focus and Sharpness
Achieving precise focus and sharpness is crucial in eclipse photography to capture the intricate details of the celestial event. To ensure your images are tack-sharp, follow these tips and techniques. Firstly, use manual focus instead of relying on autofocus, as the camera may struggle to focus accurately on the sun or moon during an eclipse. Take time to manually adjust the focus ring until the celestial body appears as sharp as possible in your viewfinder or on your camera’s live view screen. Additionally, consider using magnified focus assist or focus peaking features on your camera to ensure precise focus. Another essential aspect to consider is the use of a tripod or stable support to eliminate camera shake, which can result in blurry images. It is also recommended to use remote shutter release or a self-timer to further minimize any disturbance caused by pressing the shutter button. Keep in mind that different lenses have different optimal apertures for sharpness. Experiment with different aperture settings to find the sweet spot of your lens, where it produces the sharpest images. Lastly, to achieve the utmost sharpness, ensure your camera sensor is clean and free of dust or debris that could affect image quality. By paying attention to these focus and sharpness factors, you can capture stunning eclipse photographs with exceptional clarity and detail.
Bracketing for Exposure
Bracketing for exposure is a crucial technique that can greatly enhance the quality of your eclipse photographs. It involves capturing multiple shots at different exposure settings to ensure that you have a well-exposed image. During an eclipse, the lighting conditions can change rapidly, making it challenging to determine the correct exposure settings. By bracketing your shots, you can take a series of images, each slightly overexposed or underexposed from the others.
To use the bracketing technique, start by setting your camera to manual mode. Take a test shot to determine the correct exposure settings for the eclipse. Once you have your baseline exposure, adjust the settings to capture a series of images.
You can bracket by adjusting either the aperture, shutter speed, or both. If you choose to adjust the aperture, take a series of shots, each at a different aperture setting. This will vary the amount of light entering the camera and affect the depth of field.
Alternatively, you can bracket by adjusting the shutter speed. Take multiple shots, each with a different shutter speed setting. This will capture different amounts of light and motion blur.
Experiment with different increments for your bracketed shots. Some photographers prefer to use 1/3-stop increments, while others opt for larger intervals. By bracketing your shots, you will have a range of exposures to choose from during post-processing, ensuring that you have at least one perfectly exposed image.
When capturing bracketed shots, it’s crucial to use a tripod to keep your camera steady. This will help maintain consistency among the images. Additionally, using a remote shutter release or the camera’s self-timer can further minimize camera shake.
After the eclipse, review your bracketed shots on your computer and select the best exposure for each area of the image. You can combine these exposures using techniques like HDR (High Dynamic Range) to create a final image that accurately represents the dynamic range of the eclipse.
Bracketing for exposure is an invaluable technique that allows you to capture a wide range of details, from the corona during a total solar eclipse to the subtle shades of a lunar eclipse. Don’t be afraid to experiment with different exposure settings and bracketing increments to achieve the perfect exposure for your eclipse photographs. (Source: Famous Ophiuchus Personalities in History)
Using a Remote Shutter Release
When it comes to eclipse photography, using a remote shutter release is a game-changer. This handy device allows you to trigger your camera without touching it, minimizing the risk of blurry images caused by camera shake. The remote shutter release acts as an extension of your camera, enabling you to capture images with utmost precision and stability. Simply connect the remote to your camera and position yourself comfortably. Once you have composed your shot and set your desired camera settings, gently press the remote’s button to activate the shutter. This technique ensures that your camera remains perfectly still, resulting in sharp and crisp images. Additionally, a remote shutter release allows you to experiment with longer exposure times required for capturing the intricate details of an eclipse. By using a remote shutter release, you eliminate any vibrations that may occur when physically pressing the camera’s shutter button. Whether you opt for a wired or wireless remote shutter release, this essential tool will greatly enhance your eclipse photography experience and help you achieve stunning results. So, don’t forget to add a remote shutter release to your photography gear checklist before embarking on your eclipse photo shoot. (Source: /astrological-house-differences/)
Post-Processing and Editing
Post-processing and editing are essential steps in elevating your eclipse photographs from good to extraordinary. Once you have captured your images, it’s time to bring out their full potential through careful adjustments and enhancements. Start by importing and organizing your photos in a dedicated software program, such as Adobe Lightroom or Capture One. This will allow you to easily locate your images and maintain a structured workflow. Next, focus on adjusting the exposure and colors to accurately represent the beauty of the eclipse. Fine-tune the brightness, contrast, and saturation levels to bring out the intricate details and vibrant tones. Pay special attention to the shadows and highlights to ensure a well-balanced image. If you encounter any unwanted objects in your frame, take advantage of the cloning or healing tools to remove them seamlessly. Once you are satisfied with the edits, consider applying sharpening and noise reduction techniques to enhance the overall quality of your photograph. Keep in mind that post-processing should be used as a tool to enhance and refine your images, not to completely alter their original appearance. With a creative and skillful approach to post-processing, you can transform your eclipse photographs into stunning works of art that will leave viewers in awe.
Importing and Organizing
When it comes to post-processing and editing your eclipse photos, the first step is importing and organizing your images. This crucial process ensures that your photos are organized in a systematic and efficient manner, making it easier to locate and work with them later. Here are some tips for importing and organizing your eclipse photos:
1. Create a dedicated folder: Start by creating a dedicated folder on your computer or external hard drive specifically for your eclipse photos. This will help keep all your images in one place and avoid cluttering your computer’s storage.
2. Use subfolders for different stages: Within your main eclipse folder, consider creating subfolders to categorize your images based on different stages of the eclipse. For example, you can have folders named “Pre-Eclipse,” “Totality,” and “Post-Eclipse.” This way, you can easily locate and access the specific images you want to work on without any confusion.
3. Rename your files: Naming your image files is essential for easy identification and organization. A recommended method is to use a consistent naming convention that includes relevant information such as the date, time, and location of the eclipse. This will make it easier to search for specific images later.
4. Use software for importing: Consider using software programs like Adobe Lightroom or Capture One to import your eclipse photos. These tools offer features like batch renaming, metadata editing, and efficient organization options.
5. Add keywords and metadata: Adding keywords and metadata to your images can significantly streamline the organization process. Include relevant information such as the type of eclipse, camera settings, and any notable features captured. This will make it easier to search and filter your images later based on specific criteria.
By following these steps and implementing an organized system for importing and organizing your eclipse photos, you can save time and frustration during the post-processing stage. Having a well-structured image library will enable you to efficiently locate and work with your photos, allowing you to focus on enhancing their beauty and bringing out the best in your eclipse captures.
Adjusting Exposure and Colors
Adjusting exposure and colors is a crucial step in post-processing your eclipse photographs to enhance their visual impact. Here are some techniques and strategies to help you achieve stunning results:
1. Exposure adjustments:
– Begin by evaluating the overall brightness and contrast of your image. Use the histogram tool in your editing software to ensure a well-balanced exposure.
– Adjust the exposure settings to bring out the details in the shadows and highlights without sacrificing important areas of the image.
– Use the “Highlights” and “Shadows” sliders to fine-tune the exposure and recover any blown-out highlights or clipped shadows.
– Experiment with the “Exposure” slider to achieve the desired brightness level while maintaining the integrity of the image.
2. Color corrections:
– Evaluate the color temperature of your image to achieve a natural and pleasing color balance. Use the “White Balance” tool or adjust the temperature and tint sliders to eliminate any unwanted color casts.
– Enhance the saturation and vibrancy of the colors to make your eclipse photo more visually striking. Use the “Saturation” slider selectively to avoid oversaturating the image.
– Adjust the individual color channels (red, green, and blue) to fine-tune the overall color balance and make specific colors pop.
– Experiment with creative color grading techniques to add a unique and artistic touch to your eclipse photographs.
3. Selective adjustments:
– Use adjustment brushes or gradient tools to selectively enhance or tone down specific areas of your image. This allows you to make localized adjustments without affecting the entire photo.
– Darken or lighten the sky, adjust the colors of the foreground elements, or bring out the details in the moon by applying targeted adjustments.
Remember, post-processing is an opportunity to unleash your creativity and artistic vision. Use these techniques as starting points and feel free to experiment to achieve the desired look and feel for your eclipse photographs. By carefully adjusting exposure and colors, you can transform your already stunning images into breathtaking visual masterpieces.
Removing Unwanted Objects
Removing unwanted objects is an essential step in post-processing and editing eclipse photographs to ensure a visually pleasing final result. While capturing an eclipse, it is common to have distractions or unwanted elements present in the frame, such as power lines, stray birds, or other anomalies. Thankfully, with advanced editing software, it is possible to seamlessly remove these unwanted objects without compromising the integrity of the image.
One effective technique for removing unwanted objects is using the clone stamp tool. This tool allows you to sample a clean area of the image and clone it onto the area where the unwanted object is present. By using a soft brush and adjusting the opacity, you can gradually blend the cloned area with the surrounding pixels, creating a seamless transition.
Another method is using the healing brush or spot healing tool. This tool automatically selects and blends the surrounding pixels to match the area you want to remove. It works well for smaller unwanted objects or blemishes in the image.
For more complex removals, the content-aware fill tool can be highly effective. This tool analyzes the surrounding pixels and intelligently fills in the selected area with content that matches the background. It is particularly useful for removing larger objects or objects that are intertwined with other elements.
When removing unwanted objects, it is important to pay attention to details and ensure that the edited area seamlessly blends with the rest of the image. Zooming in and checking for any noticeable inconsistencies or artifacts is crucial to maintaining the overall quality of the photo.
Remember, the goal is to enhance the beauty of the eclipse and create a visually appealing photograph that captures the essence of the celestial event. Taking the time to remove distractions and unwanted objects will significantly improve the final result and leave you with a stunning image that showcases the captivating power of eclipses.
Safety Precautions

When indulging in the captivating world of eclipse photography, it is essential to prioritize safety to protect both yourself and your gear. Here are a few crucial safety precautions to keep in mind:
- Protecting Your Eyes and Gear: Never look directly at the sun without proper eye protection, as it can cause permanent damage to your vision. Invest in certified solar viewing glasses or use solar filters designed specifically for your camera lens. Additionally, protect your camera and lenses from the intense sunlight by using lens hoods, filters, or solar lens caps.
- Choosing the Location: Ensure you choose a safe and stable location to set up your equipment. Be aware of your surroundings and avoid setting up near cliffs, bodies of water, or other hazards that can put you at risk.
- Using Solar Filters: Using solar filters is crucial when photographing a solar eclipse. These filters not only protect your eyes but also prevent your camera sensor from getting damaged by the intense sunlight. Make sure to use a high-quality solar filter that is specifically designed for photography.
- Weather Conditions: Monitor the weather conditions closely before and during the eclipse. Avoid shooting during inclement weather, as it can compromise your safety and the quality of your photographs.
- Timely Shots: Be vigilant and mindful of the duration of the eclipse. Avoid extended exposure to the sun and take breaks to rest your eyes and equipment to prevent overheating.
By following these safety precautions, you can enjoy the mesmerizing wonders of eclipse photography while ensuring both your personal well-being and the longevity of your photography gear.
Protecting Your Eyes and Gear
When embarking on an eclipse photography adventure, it is crucial to prioritize the safety of both your eyes and your gear. The intense light emitted during a solar eclipse can cause severe damage to your eyes if proper precautions are not taken. To safeguard your eyes, always use certified solar eclipse glasses that meet the necessary safety standards. These specialized glasses have special filters that block harmful ultraviolet and infrared rays. Never look directly at the sun during an eclipse without proper eye protection, as this can lead to permanent eye damage or even blindness. It’s also important to protect your camera gear from the sun’s powerful rays. Direct sunlight can cause excessive heat and damage sensitive components of your camera. Invest in a lens hood or shading device to shield your lens from direct sunlight. Additionally, using a neutral density filter can help reduce the amount of light entering your lens, preventing overexposure. When not actively shooting, keep your camera and lenses covered with a protective cloth or in a camera bag to shield them from the sun’s intense heat and potential damage. Prioritizing the safety of your eyes and gear ensures a successful and enjoyable eclipse photography experience.
Using Solar Filters
Solar filters play a critical role in eclipse photography, ensuring the safety of both the photographer and the camera equipment. When photographing a solar eclipse, it is essential to protect your eyes and camera from the intense brightness of the sun. Solar filters are specially designed to block harmful ultraviolet and infrared rays, allowing you to capture stunning images of the sun without causing damage to your eyes or camera sensor. There are various types of solar filters available, such as solar film, solar viewers, and solar telescopes. Solar film is a cost-effective option and can be easily attached to camera lenses or telescopes using special filter holders. Solar viewers are handheld devices with built-in filters that provide a safe way to observe and photograph the sun during an eclipse. Solar telescopes, equipped with dedicated solar filters, allow for detailed close-ups of the sun’s surface, sunspots, and other solar phenomena. When using solar filters, always ensure they are properly affixed to your camera lens or telescope. Additionally, regularly inspect the filter for any scratches or damage that may affect image quality. Remember, never look directly at the sun without appropriate eye protection or attempt to photograph an eclipse without a certified solar filter. Embrace the beauty of an eclipse while prioritizing safety by utilizing solar filters in your photography endeavors.
Conclusion

As we close this guide to eclipse photography, we hope that you now feel empowered and inspired to capture the magic of these celestial events. Remember to always prioritize safety by protecting your eyes and gear using solar filters. Additionally, thorough research and planning will greatly enhance your chances of a successful shoot. Experiment with different compositions, foreground elements, and long exposure techniques to unleash your creativity. Don’t be afraid to push your camera settings and explore the possibilities that filters offer. Once you have captured your images, the post-processing stage allows you to refine and enhance your photographs. Importing and organizing your files, adjusting exposure and colors, and removing unwanted objects are all crucial steps in creating stunning eclipse photos. Whether you are capturing a solar or lunar eclipse, the key is to approach it with curiosity and an open mind. Each eclipse is unique, and with practice and patience, you will continue to develop your skills and capture incredible moments that will leave a lasting impression. So grab your camera, venture out into the night sky, and let the magic of eclipses unfold before your lens.
Remember, the universe is waiting to be discovered and documented through your eyes and your camera. Happy eclipse photography!
Frequently Asked Questions

What is the difference between a solar eclipse and a lunar eclipse?
A solar eclipse occurs when the moon passes between the sun and Earth, casting a shadow on Earth’s surface. On the other hand, a lunar eclipse happens when the Earth comes between the sun and the moon, causing the moon to fall into Earth’s shadow.
How often do solar eclipses occur?
Solar eclipses are relatively rare events. On average, they occur a few times a year, but their visibility and accessibility vary based on geographic location.
Can I photograph an eclipse with my smartphone?
While you can capture a basic image of the eclipse with a smartphone, for more detailed and high-quality photographs, it is recommended to use a digital camera with manual settings and appropriate accessories.
Are there any safety precautions I should take during an eclipse?
Absolutely! It is crucial to protect your eyes and camera equipment during a solar eclipse. Never look directly at the sun without certified solar filters, and ensure that your camera has proper solar filters as well.
What gear do I need for eclipse photography?
To capture stunning eclipse photos, you will need a digital camera with manual settings, a sturdy tripod, a telephoto lens, solar filters, and a remote shutter release for sharper images.
How can I plan the best location for photographing an eclipse?
Choosing the ideal location for photographing an eclipse requires research and planning. Look for areas with clear skies, minimal light pollution, and unobstructed views of the horizon.
Why is shooting in manual mode important for eclipse photography?
Manual mode allows you to have complete control over your camera’s settings, such as aperture, shutter speed, and ISO. This level of control is essential for achieving the desired exposure and capturing the intricate details of an eclipse.
What are some composition techniques for eclipse photography?
Incorporating foreground elements, using silhouettes, and experimenting with long exposure techniques are effective ways to enhance the composition and creativity of your eclipse photographs.
How can I edit and enhance my eclipse photos?
Post-processing your eclipse photos can bring out their full potential. Import and organize your images, adjust exposure and colors, and use editing software to remove any unwanted objects or distractions.
Do I need specialized filters for lunar eclipses?
Unlike solar eclipses, lunar eclipses do not require specialized filters to photograph. However, using a telephoto lens and a tripod will help capture sharp and detailed images of the moon during a lunar eclipse.
References
Frequently Asked Questions
What is a total solar eclipse?
A total solar eclipse is a phenomenon that occurs when the moon passes between the sun and Earth, blocking the sun’s rays and casting a shadow on Earth. This results in temporary darkness during the daytime.
How often do total solar eclipses occur?
Total solar eclipses are relatively rare events that typically occur every 18 months. However, they are only visible from specific locations on Earth, so not everyone gets to witness them.
Can I photograph a solar eclipse with my smartphone?
While smartphones are capable of taking photos, capturing a solar eclipse with a smartphone may not produce the desired results. The small size of the smartphone camera sensor and the lack of advanced manual settings can limit the quality of the images.
Do I need special equipment to photograph an eclipse?
To capture stunning photos of an eclipse, it is recommended to have a DSLR or mirrorless camera with interchangeable lenses. Additionally, specialized solar filters are necessary to protect both your eyes and the camera’s sensor from damaging levels of light.
Can I use my regular camera lens to photograph an eclipse?
While it’s possible to use your regular camera lens, using a telephoto lens will allow you to get closer and capture more details of the eclipse. A lens with a focal length between 200mm and 400mm is ideal for photographing the sun during an eclipse.
How can I ensure my eyes are protected during an eclipse?
Never look directly at the sun during an eclipse without proper eye protection. Using certified solar eclipse glasses or dedicated solar filters for your camera lens is crucial to safeguard your eyes from harmful solar radiation.
What is the best time of day to photograph an eclipse?
The best time to photograph an eclipse is during the peak of the event when the moon is blocking the maximum amount of sunlight. This moment will vary depending on the specific eclipse and your location.
How can I capture the corona during a total solar eclipse?
To capture the corona, you will need to use a long exposure and a narrow aperture setting on your camera. This will help to reveal the subtle details of the solar corona, which is the outer atmosphere of the sun that becomes visible during a total solar eclipse.
Can I use manual focus during an eclipse?
Using manual focus is highly recommended during an eclipse. The drastic changes in lighting conditions can confuse autofocus systems. Manually focusing on the sun or using the Live View feature of your camera will ensure sharp and accurate images.
How can I create a unique composition during an eclipse?
Experiment with incorporating foreground elements such as trees, buildings, or people into your composition to add depth and visual interest to your eclipse photos. Using silhouettes or long exposure techniques can also create stunning and creative effects.
References
- How to photograph a solar eclipse
- Photographing the Solar Eclipse: Tips and Techniques for …
- Tips and Techniques for Photographing the Total Solar …